> ## Documentation Index
> Fetch the complete documentation index at: https://armorsmith-designer.mintlify.site/llms.txt
> Use this file to discover all available pages before exploring further.
# Position costume parts with the Translate tool
> Move costume parts along the X, Y, and Z axes, choose Local or World coordinates, and enter exact positions in Armorsmith Designer.
Use the **Translate** tool to move a selected costume part into position on your avatar. Translation changes the part's position while preserving its size and orientation.
 ## Activate the tool
1. Left-click a part in the [Costume Viewport](/interface/viewport-navigation) to select it.
2. Click **Translate**, the four-arrow button in the toolbar above the viewport. You can also press **T** to activate the tool.
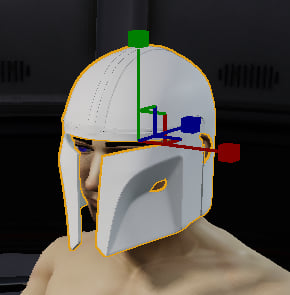
3. Drag a colored axis handle to move the part along that axis. Release the mouse button when the part is in position.
The selected part has an orange outline. The colored controls at its pivot form the translation gizmo.
## Use the translation handles
| Handle | Movement |
| - | - |
| **Red — X** | Move along the X axis. |
| **Green — Y** | Move along the Y axis. |
| **Blue — Z** | Move along the Z axis. |
| **Plane handles** | Move along two axes at once, such as X and Y. |
Drag an axis handle when you want to adjust one direction at a time. Drag a plane handle between the axes when you want to reposition the part within that plane.
## Choose Local or World coordinates
The **Transform Mode** in the [Transform Panel](/interface/transform-panel#transform-mode) determines the axes used by the tool.
* **Local** follows the selected part's orientation. Use it to move a rotated part along its own axes.
* **World** uses the fixed scene axes. Use it to align parts relative to the avatar and the rest of the costume.
Armorsmith Designer uses a Y-up coordinate system. In **World** mode, the green Y handle moves a part up or down. In **Local** mode, the axes rotate with the part.
## Enter an exact position
For precise placement, select the part and edit **X**, **Y**, or **Z** in the [Translation section of the Transform Panel](/interface/transform-panel#translation). These fields use the selected **Transform Mode**.
## Example: position a helmet
1. Select the helmet and activate **Translate**.
2. Choose **World** in the **Transform Panel**.
3. Drag the green Y handle to adjust the helmet's height.
4. Use the red X and blue Z handles to adjust its side-to-side and front-to-back position.
5. Orbit the view to check the fit from the front and side. Adjust the position until the helmet sits where you want it.
Press **Z** to frame the selected part before making small adjustments. Use **Edit > Undo** if you need to reverse a move.
This documentation is built and hosted on [Mintlify](https://mintlify.com), a developer documentation platform.
## Activate the tool
1. Left-click a part in the [Costume Viewport](/interface/viewport-navigation) to select it.
2. Click **Translate**, the four-arrow button in the toolbar above the viewport. You can also press **T** to activate the tool.
3. Drag a colored axis handle to move the part along that axis. Release the mouse button when the part is in position.
The selected part has an orange outline. The colored controls at its pivot form the translation gizmo.
## Use the translation handles
| Handle | Movement |
| - | - |
| **Red — X** | Move along the X axis. |
| **Green — Y** | Move along the Y axis. |
| **Blue — Z** | Move along the Z axis. |
| **Plane handles** | Move along two axes at once, such as X and Y. |
Drag an axis handle when you want to adjust one direction at a time. Drag a plane handle between the axes when you want to reposition the part within that plane.
## Choose Local or World coordinates
The **Transform Mode** in the [Transform Panel](/interface/transform-panel#transform-mode) determines the axes used by the tool.
* **Local** follows the selected part's orientation. Use it to move a rotated part along its own axes.
* **World** uses the fixed scene axes. Use it to align parts relative to the avatar and the rest of the costume.
Armorsmith Designer uses a Y-up coordinate system. In **World** mode, the green Y handle moves a part up or down. In **Local** mode, the axes rotate with the part.
## Enter an exact position
For precise placement, select the part and edit **X**, **Y**, or **Z** in the [Translation section of the Transform Panel](/interface/transform-panel#translation). These fields use the selected **Transform Mode**.
## Example: position a helmet
1. Select the helmet and activate **Translate**.
2. Choose **World** in the **Transform Panel**.
3. Drag the green Y handle to adjust the helmet's height.
4. Use the red X and blue Z handles to adjust its side-to-side and front-to-back position.
5. Orbit the view to check the fit from the front and side. Adjust the position until the helmet sits where you want it.
Press **Z** to frame the selected part before making small adjustments. Use **Edit > Undo** if you need to reverse a move.
This documentation is built and hosted on [Mintlify](https://mintlify.com), a developer documentation platform.