> ## Documentation Index
> Fetch the complete documentation index at: https://armorsmith-designer.mintlify.site/llms.txt
> Use this file to discover all available pages before exploring further.
# Resize costume parts with the Scale tool
> Use uniform scaling to preserve proportions, or non-uniform scaling to adjust a costume part's width, height, and depth independently.
Use the **Scale** tool to resize a selected costume part to fit your avatar. Uniform scaling changes all three dimensions together. Non-uniform scaling lets you stretch or compress one dimension at a time.
## Activate the tool
1. Left-click a part in the [Costume Viewport](/interface/viewport-navigation) to select it.
2. Click **Scale** in the toolbar above the viewport.
3. Use the viewport controls for an interactive adjustment, or enter exact values in the **Scale** section of the [Transform Panel](/interface/transform-panel#scale).
The selected part has an orange outline. With the Scale tool active, the selection box and dimension labels help you check its size as you adjust it.
## Uniform scale
Use uniform scaling when the part's shape is correct but its overall size needs to change. Width, height, and depth change by the same proportion, preserving the part's shape.
1. Select the part and find the **Scale** section in the **Transform Panel**.
2. Enable **Uniform Scale**.
3. Change one scale value. The other axes update together to preserve proportions.
4. Check the fit from the front and side before making another adjustment.
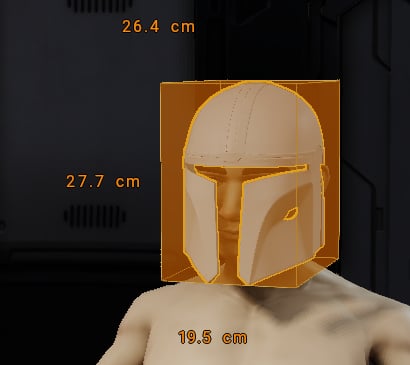
For example, applying **110%** to a part that starts at **100%** makes each dimension 10% larger. A helmet that is 19.5 cm wide becomes about 21.5 cm wide, and its height and depth increase by the same proportion.
## Non-uniform scale
Use non-uniform scaling when only one dimension needs adjustment. For example, you can widen a helmet while keeping its height and depth unchanged.
1. Select the part and find the **Scale** section in the **Transform Panel**.
2. Disable **Uniform Scale**.
3. Adjust **X**, **Y**, or **Z** independently.
4. Check the shape and fit after each adjustment.
| Axis | Dimension in the part's local orientation |
| - | - |
| **X** | Width |
| **Y** | Height |
| **Z** | Depth |
The **Transform Mode** determines the axes used for the adjustment. **Local** follows the part's orientation; **World** uses the fixed scene axes. Use [Local mode](/interface/transform-panel#transform-mode) when you want to adjust a rotated part along its own axes.
Non-uniform scaling changes the part's proportions. Check details such as circular openings, visor shapes, and adjoining edges after stretching or compressing a part.
## Example: widen a helmet
The first screenshot shows the helmet at **100%** on all three axes. Its displayed dimensions are **19.5 cm** wide, **27.7 cm** high, and **26.4 cm** deep.
 With **Uniform Scale** disabled and **Transform Mode** set to **Local**, change **X** to **165.75%** in **Percentage** mode. Leave **Y** and **Z** at **100%**. The helmet becomes **32.3 cm** wide, while its height and depth remain **27.7 cm** and **26.4 cm**.
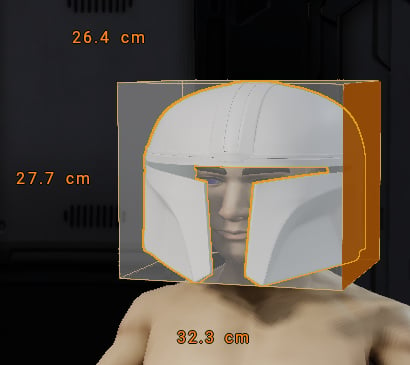 This example demonstrates an independent width adjustment. Choose values that suit your own model and avatar, then orbit the view to check clearance around the head.
## Enter percentages or dimensions
Choose **Scale Mode** in the [Transform Panel](/interface/transform-panel#scale-mode) before entering values:
* **Percentage** uses the part's original size as the reference. **100%** is the original size; **50%** halves a dimension; **200%** doubles it.
* **Absolute** lets you enter the desired dimensions in your chosen measurement units.
Use **Uniform Scale** with either mode when you want to preserve proportions. Disable it when you need to adjust individual dimensions.
Press **Z** to frame the selected part before adjusting it. Use **Edit > Undo** to reverse an adjustment. For positioning and orientation, see [Move, Rotate, and Scale Parts](/parts/transforming-parts).
This documentation is built and hosted on [Mintlify](https://mintlify.com), a developer documentation platform.
This example demonstrates an independent width adjustment. Choose values that suit your own model and avatar, then orbit the view to check clearance around the head.
## Enter percentages or dimensions
Choose **Scale Mode** in the [Transform Panel](/interface/transform-panel#scale-mode) before entering values:
* **Percentage** uses the part's original size as the reference. **100%** is the original size; **50%** halves a dimension; **200%** doubles it.
* **Absolute** lets you enter the desired dimensions in your chosen measurement units.
Use **Uniform Scale** with either mode when you want to preserve proportions. Disable it when you need to adjust individual dimensions.
Press **Z** to frame the selected part before adjusting it. Use **Edit > Undo** to reverse an adjustment. For positioning and orientation, see [Move, Rotate, and Scale Parts](/parts/transforming-parts).
This documentation is built and hosted on [Mintlify](https://mintlify.com), a developer documentation platform.