> ## Documentation Index
> Fetch the complete documentation index at: https://armorsmith-designer.mintlify.site/llms.txt
> Use this file to discover all available pages before exploring further.
# Measure distances with the Measurement tool
> Click two points in the scene to measure the distance between them in Armorsmith Designer.
Use the **Measurement** tool to check the distance between two points in the scene. You can measure across the avatar, across a costume part, or between the avatar and a part to check clearance.
 ## Activate the tool
Open the **Costume** viewport and click **Measure**, the ruler button in the toolbar above the viewport. You can also choose **Edit > Measure** from the [menu bar](/interface/menu-bar#edit-menu).
## Measure between two points
1. Left-click the avatar or a costume part at the point where you want to start measuring.
2. Move the pointer toward your second point. The measurement line and distance update as you move over the scene.
3. Left-click the second point to finish the measurement.
4. Read the distance shown between the two endpoint markers in the viewport.
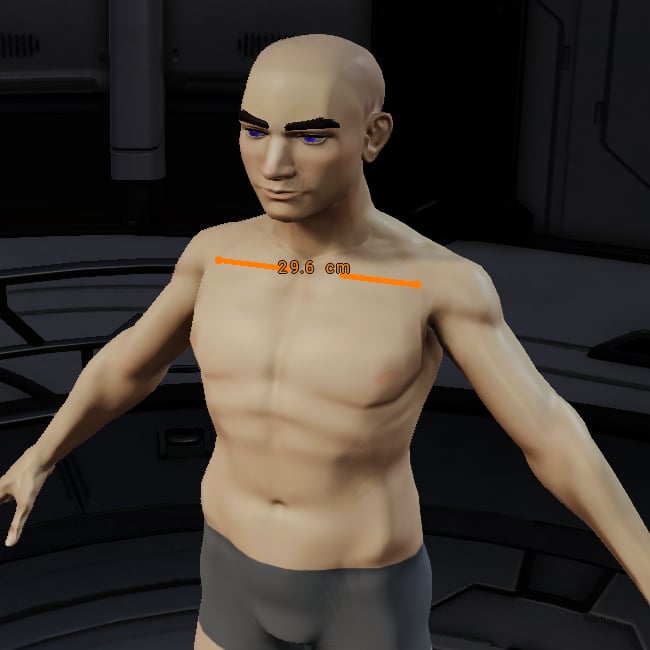
The screenshot above shows a completed measurement of **29.6 cm** across two points on the avatar's upper chest. Your result depends on the points you click and the size of your avatar or parts.
The tool measures the straight-line distance between the points in 3D. It does not follow the curve of a surface, so a measurement across the chest is not a chest circumference.
## Take another measurement
With the **Measurement** tool still active, left-click a new starting point. Move the pointer to preview the distance, then left-click the new endpoint. The new measurement replaces the previous one.
Measuring does not move, resize, or reshape your avatar or costume parts. Choose another tool when you are ready to continue editing.
## Choose measurement units
Open **Settings > Preferences**, select the **Measurements** tab, and change **Current Units**. The distance readout uses your current unit setting. See [measurement preferences](/interface/preferences#current-units) for more information.
## Tips for choosing points
* Orbit and zoom the [Costume Viewport](/interface/viewport-navigation) so you can clearly see both surfaces you want to measure.
* Click directly on the avatar or part surface at each endpoint.
* For a clearance check, click one point on the avatar and one on the nearby costume part. The result describes the gap between those specific points.
* Measure again after [moving or scaling a part](/parts/transforming-parts) to check the updated distance.
This documentation is built and hosted on [Mintlify](https://mintlify.com), a developer documentation platform.
## Activate the tool
Open the **Costume** viewport and click **Measure**, the ruler button in the toolbar above the viewport. You can also choose **Edit > Measure** from the [menu bar](/interface/menu-bar#edit-menu).
## Measure between two points
1. Left-click the avatar or a costume part at the point where you want to start measuring.
2. Move the pointer toward your second point. The measurement line and distance update as you move over the scene.
3. Left-click the second point to finish the measurement.
4. Read the distance shown between the two endpoint markers in the viewport.
The screenshot above shows a completed measurement of **29.6 cm** across two points on the avatar's upper chest. Your result depends on the points you click and the size of your avatar or parts.
The tool measures the straight-line distance between the points in 3D. It does not follow the curve of a surface, so a measurement across the chest is not a chest circumference.
## Take another measurement
With the **Measurement** tool still active, left-click a new starting point. Move the pointer to preview the distance, then left-click the new endpoint. The new measurement replaces the previous one.
Measuring does not move, resize, or reshape your avatar or costume parts. Choose another tool when you are ready to continue editing.
## Choose measurement units
Open **Settings > Preferences**, select the **Measurements** tab, and change **Current Units**. The distance readout uses your current unit setting. See [measurement preferences](/interface/preferences#current-units) for more information.
## Tips for choosing points
* Orbit and zoom the [Costume Viewport](/interface/viewport-navigation) so you can clearly see both surfaces you want to measure.
* Click directly on the avatar or part surface at each endpoint.
* For a clearance check, click one point on the avatar and one on the nearby costume part. The result describes the gap between those specific points.
* Measure again after [moving or scaling a part](/parts/transforming-parts) to check the updated distance.
This documentation is built and hosted on [Mintlify](https://mintlify.com), a developer documentation platform.