> ## Documentation Index
> Fetch the complete documentation index at: https://armorsmith-designer.mintlify.site/llms.txt
> Use this file to discover all available pages before exploring further.
# Reshape costume parts with the FFD tool
> Use Free Form Deformation to reshape costume parts with a lattice cage, adjust control points, and refine their fit on your avatar.
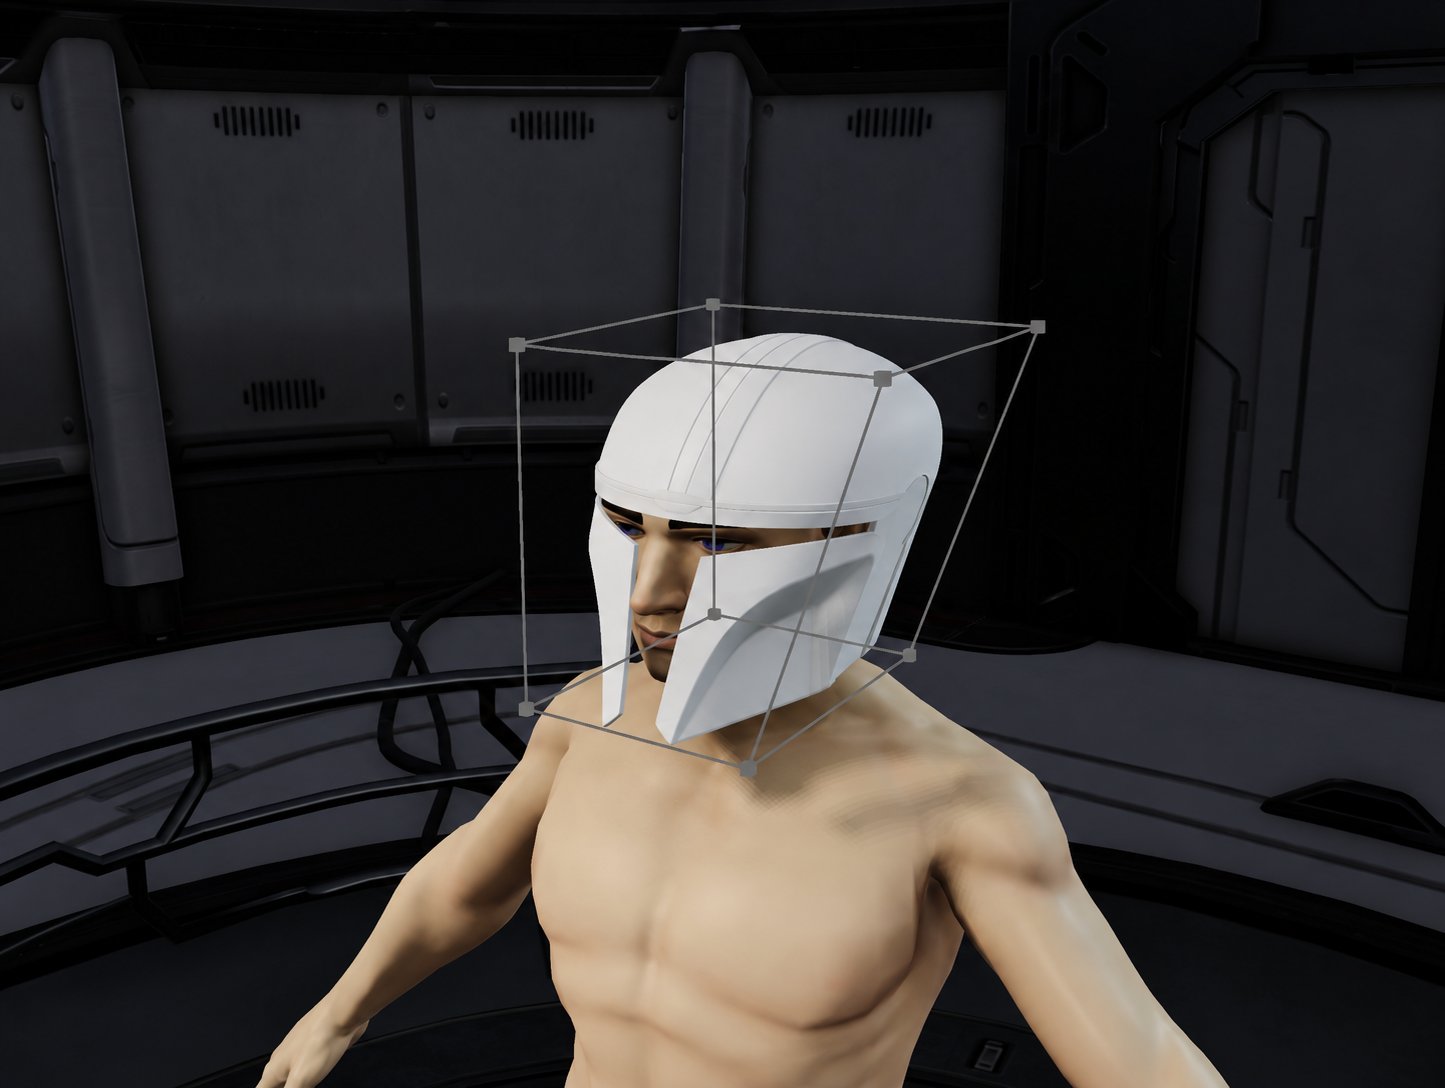
Use **Free Form Deformation (FFD)** to reshape a costume part with a lattice cage. Moving the cage's control points changes the mesh smoothly across the part. For example, you can flare a helmet's lower edge while keeping the crown closer to its original shape.
Use [Scale](/interface/scale-tool) when you need to resize the whole part. Use FFD when different areas need different adjustments, such as tapering armor or changing the curvature of a helmet.
 ## Activate the tool
1. Left-click a costume part in the [Costume Viewport](/interface/viewport-navigation) to select it.
2. Click **FFD Tool** in the toolbar above the viewport. You can also right-click the selected part and choose **Free Form Deformation**.
3. In the **Free Form Deformation** dialog, choose **Width**, **Height**, and **Depth** for the cage.
4. Click **Apply** to create the cage around the part.
If the part already has an FFD cage, activating the tool shows that cage again so you can continue editing.
## Choose the cage resolution
**Width**, **Height**, and **Depth** specify the number of control points along each cage axis. Each value can be from **2** to **20**, and the default is **2** on every axis.
| Cage resolution | When to use it |
| - | - |
| **2 × 2 × 2** | Start with eight corner points for broad changes, such as tapering or flaring a part. |
| **3 × 3 × 3** | Add middle control points when you need more control over the shape between the ends. |
| **Higher values** | Use more points when the adjustment needs finer control. The cage becomes denser and harder to select. |
These values control the cage resolution. They are not measurements of the part's width, height, or depth.
## Select and move the cage
1. Left-click a square control point to select it.
2. Activate [Translate](/interface/translate-tool), or press **T**.
3. Drag a translation handle to move the selected point. The mesh follows the cage as you adjust it.
4. Orbit the view and check the result before making another adjustment.
You can also select an edge to move its two endpoint control points together, or select a cage face to move its four corner points together. Use these selections for broader adjustments.
Make small changes. A control point influences the surrounding shape, so check visor openings, panel details, and edges that need to meet adjoining parts. Use **Edit > Undo** to reverse an adjustment.
## Example: flare the lower edge of a helmet
1. Position and scale the helmet on your avatar before activating FFD.
2. Start with a **2 × 2 × 2** cage.
3. Select a lower control point and move it outward slightly with **Translate**.
4. Adjust the corresponding point on the other side if you want a balanced shape.
5. Inspect the helmet from the front, side, and back. Check clearance around the head and neck, and refine the lower points as needed.
## Finish or resume editing
Click **FFD Tool** again to leave cage editing. The cage is hidden and the part keeps its adjusted shape. Select the part and activate **FFD Tool** again to return to its existing cage.
Save your costume when you are satisfied with the fit. For overall positioning and orientation, see the [Translate](/interface/translate-tool) and [Rotate](/interface/rotate-tool) guides.
This documentation is built and hosted on [Mintlify](https://mintlify.com), a developer documentation platform.
## Activate the tool
1. Left-click a costume part in the [Costume Viewport](/interface/viewport-navigation) to select it.
2. Click **FFD Tool** in the toolbar above the viewport. You can also right-click the selected part and choose **Free Form Deformation**.
3. In the **Free Form Deformation** dialog, choose **Width**, **Height**, and **Depth** for the cage.
4. Click **Apply** to create the cage around the part.
If the part already has an FFD cage, activating the tool shows that cage again so you can continue editing.
## Choose the cage resolution
**Width**, **Height**, and **Depth** specify the number of control points along each cage axis. Each value can be from **2** to **20**, and the default is **2** on every axis.
| Cage resolution | When to use it |
| - | - |
| **2 × 2 × 2** | Start with eight corner points for broad changes, such as tapering or flaring a part. |
| **3 × 3 × 3** | Add middle control points when you need more control over the shape between the ends. |
| **Higher values** | Use more points when the adjustment needs finer control. The cage becomes denser and harder to select. |
These values control the cage resolution. They are not measurements of the part's width, height, or depth.
## Select and move the cage
1. Left-click a square control point to select it.
2. Activate [Translate](/interface/translate-tool), or press **T**.
3. Drag a translation handle to move the selected point. The mesh follows the cage as you adjust it.
4. Orbit the view and check the result before making another adjustment.
You can also select an edge to move its two endpoint control points together, or select a cage face to move its four corner points together. Use these selections for broader adjustments.
Make small changes. A control point influences the surrounding shape, so check visor openings, panel details, and edges that need to meet adjoining parts. Use **Edit > Undo** to reverse an adjustment.
## Example: flare the lower edge of a helmet
1. Position and scale the helmet on your avatar before activating FFD.
2. Start with a **2 × 2 × 2** cage.
3. Select a lower control point and move it outward slightly with **Translate**.
4. Adjust the corresponding point on the other side if you want a balanced shape.
5. Inspect the helmet from the front, side, and back. Check clearance around the head and neck, and refine the lower points as needed.
## Finish or resume editing
Click **FFD Tool** again to leave cage editing. The cage is hidden and the part keeps its adjusted shape. Select the part and activate **FFD Tool** again to return to its existing cage.
Save your costume when you are satisfied with the fit. For overall positioning and orientation, see the [Translate](/interface/translate-tool) and [Rotate](/interface/rotate-tool) guides.
This documentation is built and hosted on [Mintlify](https://mintlify.com), a developer documentation platform.